Ok, this is my new build thread for my k20 1997 Honda Civic EK9. To cut a long story short, I built another K20 civic last year - build can be found at k20civic.blogspot.com but had a run of bad luck with it - 2 snapped driveshafts, one alternator dropping off at 90MPH, culminating with a mis-shift at Castle Combe sending the engine to the big scrap yard in the sky. In a moment of madness I decided to break it and buy a DC5. After spending a fortune on it, I realised that the DC5 had nothing on my K20 civic so I sold it. So now, here I am, back to square 1(a). But the theme this time round, is bigger, better, faster and more reliable!!
So what do I have planned and what am I doing different this time round? Two main differences:
1. First thing was the engine postion which was too far forward creating sharp driveshaft angles - hence they kept breaking. This time round I'm using Hasport EKK2 mounts which postion the engine further back and higher up - allowing for better shaft angles and greater sump clearance (another problem with the old mounts). The EKK2 mounts require the EK9 subframe, steering rack, lower arms, forks and ARB to be swapped for a DC2 or EG items. I've gone for a DC2 setup so I retain the large ARB at the front.
2. The engine!! Last time I had a stock K20A2 with ClockwiseMotion roller ITBs and custom manifold - approx 240bhp on an engine dyno (that's probably 260BHP on a chassis dyno LOL!). It was awesome. But Ian at ClockwiseMotion had been doing some engine development since my last engine and now the plan is:
Block: K20 block, darton MID liners, 89mm custom pistons, custom rods, S2000 crank. (just under 2300cc)
Head: Crower or custom cams - headwork yet to be finalised.
Intake: CWM Roller Throttle Bodies
Header: Hytech custom 4-2-1
ECU: OBR EFI
Running gear: - EP3 box, Quaife diff, lightened flywheel, stage 1 clutch, 400BHP driveshafts.
300BHP?? We will have to see......
STAGE1
1. Engine out so time to clean the engine bay and give it a re-spray
2. Preparation of the DC2 subframe. Pic on left shows difference between EK and DC2/EG subframe (you can see where the extra clearance comes from). The EKK2 mounts for RHD vehicles need a lug welded on - so whilst I was doing this, I also welded on another support bracket for the mount as it looked a bit weak there (see pic). The DC2 subframe bolts straight up to the EK9 chassis - amazing!
3. Mounts installation - the EKK2 mounts are 6mm plate chassis-side brackets and billet engine- side mounts. Whilst the brackets are well made and 6mm, I wanted to re-inforce them - overkill maybe but, they are designed for a bolt on solution and as I can weld, I decided to make them more bespoke fitting. SO the rear bracket has an additional support welded on the subframe. The RHD drivers side mount has an angle welded on the rail and the passenger side mount will have a support bolted from the upper control arm bolt to the mount.
4. Radiator - Half width rad is probably not going to be up to the job of 300BHP so I wanted a full width rad, but because of the ITBs and engine location I needed a rad which had the inlet/outlet on the right hand side. After quite a bit of trawling, it looked that the Mitsubishi EVO 4 - 6 rad looked like it fitted the bill - albeit a little on the wide and high side. I took a chance, bought a Koyo one and with a bit of slam panel chopping and re-welding of the bottom mounts, it fits a treat!
5. PAS - I'm using my MR2 electro hydraulic PAS system I had on my old car (as I lose PAS from the K20 because of the ITBs). This system worked brilliantly. Welded in a couple of captive nuts in the side rail (the nuts are actually harness backing plates!). No PAS is a no no for me- I tried it and I reckon a non-assisted PAS rack with that much power is just dangerous!
6. Good old Karcepts mount (thanks Brian) and Buddly Club short shifter. Only additions I made here was some tack welding around the cut out for the shifter box as the cut out removes some of the spot welding separating two layers of chassis plate. I'll be modding the shifter box to take my home made shift indicator!
7. Shift/Gear indicator. After my experience at Castle Combe I though it wise to get some kind of gear indicator. Couldnt find anything off the shelf so made one up myself using a few microswitches on the shifter box and an array of 8 segment LED displays. I ran this on my DC5 and it was great.
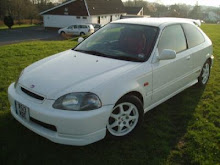
My EK9
Work starts!
EK vs DC2 subframe
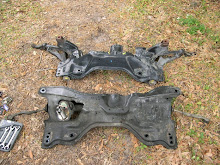
EK vs DC2 subframe (pic from K20.org)
Subframe welding
Subframe welding
Re-inforcing the mounts
Re-inforcing the mounts
My Koyo Rad!
My Koyo Rad!
MR2 PAS pump
BC shifter & Karcepts mount
Modded Shifter box
Home made shift/gear indicator

Engine bay ready